Archive for the ‘Naughty’ Category

Gooey Brownies

Wednesday, September 10th, 2008

Chocolate brownies

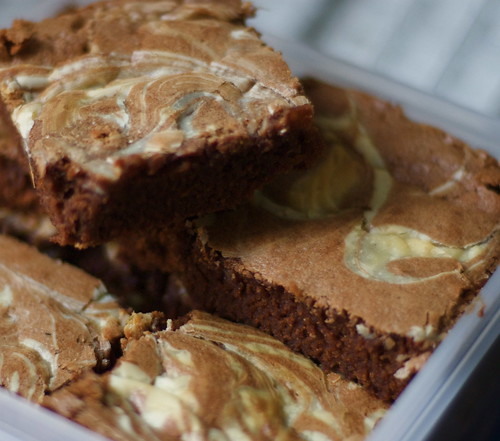
There is nothing better than tucking into a really rich, chocolately, gooey brownie and they are so easy to make, so I thought I would satisfy my chocolate urge and make a batch. I tend to follow Rachel Allen’s recipe in her book Rachel’s Favourite Food but sometimes play around with the recipe. I like to put nuts into my brownies as I think they really compliment the chocolate flavour, especially hazelnuts, and help to keep them moist but I’m never sure about putting nuts into them when they are for other people as not everybody likes them (in this instance they should be taken out and shot for the weird anti-nut people they are…. just kidding, don’t write in!)

This time I just went for rich dark chocolate swirled with white chocolate and very nice they were too. 

Makes about 14 large brownies

180g butter

150g good quality dark chocolate

100g good quality white chocolate

3 eggs

175g golden caster sugar

75g dark muscovado sugar

110g plain flour

tsp vanilla extract

Preheat the oven to 180 degrees centigrade and line a swiss roll tin (9 x 13 inch) with greaseproof paper. Melt the butter and dark chocolate in a bowl over some barely simmering water being careful not to overheat the chocolate. In another bowl melt the white chocolate then set it aside. Beat the eggs, sugar and vanilla extract together in a bowl until light and doubled in volume. Once melted, let the chocolate cool for a minute or two and then stir into the eggs and sugar mixture. Sift the flour and fold into the mixture then tip into the prepared tin, spreading it out to the sides. Take the white chocolate and drizzle spoonfuls over the top of the mixture and then take a skewer and swirl the white chocolate a little to make a nice pattern. Cook the brownies for about 15 to 20 minutes. They will still seem very soft and undercooked when they come out, the mixture will not spring back when you touch, it isn’t like a sponge. Everyones oven is different and it may be a bit of trial and error to begin with but that is no hardship as they will still be good to eat. Cut while still warm and take out of the tin when cool. Enjoy


Fish and Chips

Tuesday, August 26th, 2008

Crisp battered fish

I have always been a bit wary of trying battered fish as I had visions of a blazing chip pan inferno and fire engines carrying uniformed, sweaty, powerful men to help hose down your ikea kitchen cabinets, rescue your kitty from the next door neighbours tree etc. etc. (well every cloud has a sliver lining). I opened this months Good Food magazine and spied Golden beer battered fish with chips and plucked up the courage to give it a go. This recipe oven bakes the chips so you have just the one pan to keep your eye on and everything can be served at the same time minus the singed eyebrows. 

The recipe turned out quite nicely but I made a few adjustments as I felt the chips weren’t very crisp. I think this was because there wasn’t enough oil used and I don’t think they were boiled long enough. The recipe also mixed the flour and cold oil together with the chips before being put in the oven. I think tossing the steaming chips in the flour and heating the oil in the oven first should make sure they come out crisp.

The other problem was that the fish fillets were not as nice and thick as I would have hoped but I think a trip to the fish mongers early on a Saturday morning might remedy that instead of relying on the supermarket. I also would have liked the batter to be a bit thicker, so I reduced the amount of liquid in the recipe.

Give it a go and tell me what, if any other alterations you would make.

Serves 2

For the Fish:

50g plain flour

50g cornflour

1 tsp baking powder

1/4 tsp tumeric

75ml fridge cold lager

50 ml fridge cold sparkling water

1 ltr sunflower oil

400g fillet sustainable cod, hake or haddock

seasoning

For the chips:

750g maris piper potatoes, peeled and cut into chunky chips

2 tbsp plain flour

4 tsp olive oil

seasoning

Begin by making the batter. Put the flours, seasoning and baking soda into a bowl. Set aside 1 tbsp of the mixture onto a plate then, whilst whisking slowly, add the liquid to the bowl combining until it forms a smooth lump free batter. Put in the fridge for about 30 mins.

Heat the oven to about 190 degrees centigrade. Put the olive oil onto a baking sheet and put in the oven to heat up. Heat a pan of salted water to boiling point and add the chips. Cook for about three or four minutes until the outside is slightly soft, drain and rough the edges of the chips by shaking them gently in the pan. Toss the chips immediately in the flour and add them to the hot oil. Turn them around carefully in the oil and put into the oven. Cook for about 35 to 40 minutes until golden and crisp. 

Heat the sunflower oil in a deep pan until a drop of batter crisps up immediately when dropped into the hot oil. Dry the fish by patting it with kitchen paper then toss in the flour that you set aside earlier and shake off the excess. Drape the fish into the batter to cover completely, allow the excess to drip off briefly, then lower the fish into the hot oil and lay it away from you. Cook for about 6-8 mins depending on the thickness of your fillet, until golden. Remove the fish with a slotted spoon, drain on kitchen paper and sprinkle sea salt over the top, keep warm. Repeat with the other fillet. Remove the chips from the oven and sprinkle with sea salt. Serve immediately with some home made tartare sauce.

Fish and chips


Eggs Benedict

Sunday, August 24th, 2008


Eggs benedict

I have always wanted to perfect poached eggs but never quite got them right, until now. I came across a blog post from Smitten Kitchen on the subject and plucked up my courage to give it a go and hey presto! perfect poached eggs. My new found skill has been featuring a lot now and I really wanted to try making the classic eggs Benedict. The only hard parts about it are making the hollandaise, although you could buy it, and of course poaching the eggs, so most of it really. Here’s my take on it, I hope you give it a try. 

Ingredients:

serves 2

1 English muffin (not the sort you have with coffee, they are very different)

2 fresh large eggs and 1 small egg yolk

1 tbsp lemon juice

1 heaped tsp mustard

75g fridge cold unsalted butter cut into cubes (this is supposed to be clarified butter but I couldn’t be bothered)

seasoning (don’t add salt if you are using salted butter)

2 slices good quality ham 

First make the hollandaise sauce by putting the egg yolk, mustard, lemon juice and seasoning into a bowl over a pan of simmering water. Whisk until it begins to froth and then start adding the butter a cube at a time, whisking it in as it melts. Continue to do this until the butter is used up and the sauce has a thick soft whipped cream consistency. Check the seasoning and then set to one side.

Cut the muffin in half and lightly toast then top each half with the ham and keep warm in a low oven.

To make the poached eggs put a large pan of water with splash of vinegar on the hob and bring to simmering point. Break each egg into a dish first (I cook each one separately to avoid disaster), swirl the water and drop the egg into the middle of the water vortex. Let it set a little for a few seconds and very gently tease it off the bottom so that it doesn’t stick. Cook for about three or four minutes, remove the egg with a slotted spoon and set the spoon onto some kitchen paper to drain. Then gently slide the egg onto the warm ham and muffin and top with a dollop of hollandaise. Repeat the process for the other egg. Delicious


Tour De France birthday cake

Sunday, August 10th, 2008

Tour de France birthday cake

I have been a bit busy of late and haven’t had a much of a chance to post anything on the blog so I have a bit of a backlog. I will eventually get to it but in the meantime I’ll post a picture of the birthday cake I made for the other half for his birthday.

He is a keen cyclist and has been glued to the Tour De France over the last few weeks, so I thought a stage of the tour would be a good idea for a cake. Carving an unusual shape for the mountain and icing it was most fun but making the bicycle was a bit of a chore and I eventually thought that it would be easier to make a broken bike and a rather battered, bruised and disheveled looking cyclist. Throughout the tour you notice a lot of graffiti on the road, mainly for a local terrorist separatist group and large scale male and female genitalia, but I thought it might be a tad more tasteful just to put some of the competitors names on the road instead. He was really impressed with it so I will now use this as leverage for almost any household task for the next thirty plus years. 

Chocolate flop to chocolate heaven

Monday, July 14th, 2008

Chocolate fondant

Having seen a lot of failed attempts at Chocolate fondant puddings on Celebrity Masterchef this week, I thought I would like to give one a try. I have had shop bought ones before and relished their divine rich taste. To me they are the ultimate of decadent puddings, and the worst things for you always taste the best.

The recipe I followed from the BBC Food page seemed simple enough but I fell at the final hurdle of timings and ended up with a runny, albeit delcious, mess served with orange and vanilla ice cream. I remained undeterred, though, had another go the following night and left them in for a few minutes longer, which was much more successful but still not quite done enough. They still tasted absolutely divine, but I will keep trying until I get the perfect consistency. It’s a hard job, but somebody’s gotta do it!

Chocolate flop

My first freebie

Wednesday, July 9th, 2008

Saffron risotto with pan fried queenie scallops and orange and toasted pine nut butter

When Nick Pledger from Island Seafare Ltd said he would like to send me some Queenie scallops to try I was very excited. It was all in aid of the up and coming Isle of Man queenie scallop festival and marine day which is taking place for the first time to celebrate the well loved local seafood. There is also a competition to enter your best queenie scallop recipe, with the prize being that the Hairy Bikers will cook your recipe on marine day and you will receive a personalised trophy and £100 worth of seafood. 

While waiting for my exciting delivery I wracked my brains as how best to capture their subtle soft flavour and came up with a few ideas but since he very kindly sent me 1 Kilo of the little beauties I could try them all.  The first one I wanted to try was a saffron risotto but I didn’t want to mix the scallops into it, I wanted to showcase them round the edge of a risotto-y mound and have some sort of butter melting over them. The presentation is a little pretentious but I think it looks good and it shows off the most important part of the dish. The taste was really good too, even if I do say so myself.

Ingredients

12 Queenie scallops

200g risotto rice

750ml of fish, vegetable or chicken stock

half a wine glass of white wine or vermouth

a very large pinch of saffron

a tblsp of olive oil

a stick of celery, finely chopped

1 medium onion, finely chopped

zest of an orange

40g butter

a handful of pine nuts, toasted

salt and freshly ground black pepper

smoked Maldon sea salt (optional)

extra virgin olive oil to serve.

Begin by making the butter. Coarsely chop the toasted pine nuts, place them in a bowl with the orange zest, a little seasoning and the butter and mash together with a fork. Leave to one side. Heat the olive oil in a pan over a medium heat, add the onion and celery and cook for about five minutes to soften. Stir in the rice to coat it with the oil and cook for a minute then add the vermouth or white wine and stir until it is all absorbed. Bring the stock up to simmering point and add the saffron. Start adding ladles of the stock into the rice and stir continuously until it is absorbed. Repeat the process until the rice become soft, but still retains a very slight bite. Once cooked, take the risotto off the heat, dollop half the butter on top and cover with a lid for about 10 minutes.

Take your scallops, remove the coral and toss them both separately in olive oil. Heat a frying pan over a medium to high heat and add the corals. Cook for a couple minutes until nicely coloured then stir into the risotto. Season the risotto to taste then place a mound of the risotto in the middle of a warmed plate. Take the scallops, add them to the pan and cook for about a minute on each side. Dot the rest of the butter on the top of each scallop and allow to melt. Remove from the pan and arrange around the plate, drizzling with the buttery juices from the pan and a little extra virgin olive oil. Finally crumble a few crystals of the smoked sea salt on top of each scallop and serve immediately.

Sewing box cake

Wednesday, July 2nd, 2008

Sewing box cake

This is another cake that I made for someone in work. It was for their Grandmother’s 90th birthday and she apparently was very keen on knitting, sewing and cross stitch so I decided on a sewing box cake. The name is done in brush embroidery, which is a really nice effect where you pipe the required design and then take a very slightly damp paintbrush and drag the icing in. I am definitely getting better at the icing and having less mishaps which is good really as I’m doing my Cousin’s wedding cake in October!

Vanilla panna cotta with strawberries and lemon thyme sugar

Sunday, June 22nd, 2008

Strawberries in the garden

I have seen quite a few recipes for panna cotta recently and since I have never tried to make it, I wanted to give it a go. I found this recipe and thought it looked nice and simple and now that the strawberries in my garden were starting to blush into a vibrant red colour, I wanted to serve them with it.

I first of all made the lemon thyme sugar. I bought a bunch of lemon thyme the other day to go with squid but I don’t actually like it much in savoury things as I think it tastes a bit soapy so I wondered whether I could make something sweet with it. Basil sugar seems to be very fashionable at the minute so I thought I would try and do the same with lemon thyme.

Pick the leaves off a small bunch of lemon thyme and blitz in a blender with about 6 tablespoons of caster sugar. It should go a nice green colour but will also be a bit damp so spread it out on a baking sheet and put in a very low oven for about 10-15 minutes until it has dried out. You can then keep your sugar in a sealed container and use it whenever you like. 

I made the panna cotta next and left it to cool in the fridge for an hour or so. 

Next take a couple of handfuls of fresh ripe strawberries (you can pretty much use any fruit you like here) hull and halve them and put into a saucepan with a tablespoon of icing sugar and about half a tablespoon of Limoncello liqueur. Warm the berries until the juices start to run but don’t let the strawberries go too soft. Take off the heat and leave to cool. 

Once the panna cotta is set, loosen it from it’s mould and turn out onto a plate, scatter the strawberries around and garnish with the lemon thyme sugar.

Vanilla panna cotta with marinated strawberries and lemon thyme sugar

The texture and taste of the panna cotta was lovely but the only thing I didn’t like was that all the vanilla seeds sunk to the bottom of the mould and made the panna cotta look burnt and I also need to work on getting them cleanly out of the mould. I think my blowtorch may have to be used. I will definitely have another go at making panna cotta and might try a few different flavours too. 

Summer boozing

Sunday, June 15th, 2008

Cherries

I bought this months BBC Good Food magazine and was very excited when I came across a recipe for cherry vodka. The other half and I are partial to the odd gin, but haven’t really drunk much vodka for years. I knew I had a bottle in the cupboard that had been untouched for some time, so I thought a revamp of it’s flavourless, colourless contents would be a tremendous idea and in a few weeks time we would be able to able savour it’s luscious sweet flavours in a cocktail or two sat in the sun (hopefully). 

I took 400g of ripe red cherries, slit them, but not completely through and then added them to a saucepan of 200g caster sugar and 150ml of water. The cherries were then heated gently to dissolve the sugar and release the juices, then popped into a large jar and 700ml vodka added. I then sealed the jar, gave it a shake and will now wait patiently for four weeks until it is ready.

Cherry Vodka

Chicken, Olive and preserved lemon pie

Monday, June 9th, 2008

Chicken, olive and preserved lemon pie

I still had most of a jar of preserved lemons left after buying them for the cous cous dish I did a while ago and since my other half would happily have pie every day of the week and has been bugging me to do this recipe ever since I got the book, I decided to give it a go.

The book is called Sophie Conran’s Pies and is full of lovely pie recipes to get you salivating.

The recipe serves 4

Ingredients:

Couple of glugs of olive oil

knob of butter

4 leeks halved length ways and sliced thinly

1 tsp ground cumin

4 small preserved lemons, rinsed and roughly chopped

1kg chicken thighs, boned, skin removed and cut into about 1 1/2 inch cubes

2 tbsp plain flour

250ml chicken stock, as good quality as possible

200g green olives, ( I quite like black olives too, but are a bit stronger in taste) stoned and roughly chopped

3 tbsp flat leaf parsley, roughly chopped

300g puff pastry (you can make this yourself if you are feeling adventurous, but I never have)

1 free range beaten egg

salt and freshly ground black pepper

Heat a large casserole on a medium heat and add a glug of olive oil and a knob of butter. Fry the leeks for about five minutes until soft but not coloured. Add the cumin and fry for another minute to release it’s aromatic flavour. Stir in the chopped lemons and leave to one side.

Then heat a frying pan over a medium to high heat and add olive oil. Brown the chicken off in batches, trying not to over crowd the pan. Add the chicken and all the cooking juices to the casserole with the leeks in it and sprinkle over the flour.

Stir in the flour and cook for a few minutes before gradually adding the stock. Simmer gently for about seven minutes and when the sauce has thickened nicely add the olives and parsley. Remove from the heat and allow to cool.

Pre heat the oven to 200 deg centigrade. Once cool,spoon the chicken mixture into a suitable pie dish. Roll out a the pastry so it is large enough to cover the pie dish, brush the rim of the pie dish with beaten egg and place the pastry on top. Press down around the edges with a fork or your thumb and then trim off the excess. Make a pretty pattern with the excess if you like (I made a disabled chicken, do you like it?.. I forgot to brush him with egg though so he didn’t show up too well). Brush all over with the beaten egg and then make a cut in the middle so that steam can escape and help the pastry to crisp up nicely. Place in the oven for about 25 minutes until golden.

Chicken pie revealed

You can serve it with whatever you like. We had it with basmati rice, as the author suggested, but it would also be nice with mashed spiced sweet potato.